Maximizing Nature's Bounty
+60172821219
enquiries@suriahelanglui.com
18 May 2015

Bananas: Berangan or Emas

I admit it – I still prefer the originals, no genetically modified for me.  The taste you get from the originals are special.  Pisang Berangan is about slightly more than double the size of Pisang Emas and the difference doesn’t stop there.  Both bananas are eaten raw but over-ripe pisang emus can be turned into a lovely pancake and also our favourite local cucur – cucur kodok or as the northerners call it: cok kodok.  However, both varieties do not make good banana fritters as they tend to soak in lots of oil.
Just ripen, pisang berangan (left) and pisang emas (right)

Two days later, you can see the difference in the skin colours.

The pisang berangan skin turns yellow as it matures and as it further ripens has a slight orange tint to it.  The flesh is white and has a sweet taste with a subtle sourness to it.  The texture is almost cake-like with a lower water content by comparison and almost melt in your mouth.  Because of the taste and texture, it tastes great when turned into a banana split with chocolate or vanilla ice cream as it balances the creamy sweet taste of the ice cream.

Pisang berangan (left) and pisang emas (right)

By comparison, pisang emus skin turns yellow as it matures but as it further ripens, becomes a golden yellow.  The flesh is slightly yellow and it gets to be a golden yellow as it further ripens.  The texture is more solid and it gets even sweeter as it ripens.  When it is over-ripe, it tends to get slightly watery due to its higher water content making it easy to turn into a mush for pancakes or cok kodok.

01 Apr 2015

Alternative beverage: Calamansi, Misai Kucing and Soursop Leaves

I always find it fascinating when you can blend different leaves and fruits and obtain a delicious beverage whilst being able to reap lots of health benefits.  I always try to go local, what we have had traditionally and rediscovering what our ancestors knew but didn’t have the science to back it up.  My latest concoction is the mix of fresh calamansi juice with tea  from a blend of misai kucing (cat’s whiskers) leaves and flower and soursop leaves.  I add a little bit of sugar – sometimes pure cane sugar, sometimes rock sugar and sometimes just regular sugar and serve chilled.  The end result is a delicious refreshing drink that quenches my thirst whilst providing me with lots of good stuff – definitely not medicine-tasting.

So, what plants do you need in your garden: calamansi (lima kasturi), cat’s whiskers (misai kucing) and soursop (durian belanda) – all three grow well in our weather and flourishes when grown organically.  The soursop fruit is also prized so you can get double benefit by planting this in your garden.  The soursop tree can get to be tall but growth can be controlled with pruning.  The misai kucing is a shrub with beautiful lavender flowers (another colour is white flowers) so can be located almost anywhere and can be used as a border shrub.  Pruning it to shape it also encourages new growth and more flowers.  The calamansi tree grows to about 3-4m tall and regular pruning would encourage new shoots and flowers as well as allow you to shape the tree.

To start with, harvest the leaves and flowers and chop them up and dry.  Get soursop leaves, preferably from the fourth leave from the end of the branch which are mature and a dark green in colour.  This contains the most nutrients.  Chop them up and dry them.  You can then mix the two to provide a blended tea, the proportions of it depends of taste you desire.  If you are making your own, it is great to experiment the ratio mix to your taste.

Why do I like the this beverage so much? From my research I found that amongst the benefits are :  from the misai kucing, I get the blood cleansing, sugar regulator, high blood pressure therapy, acids like uric acid cleansing; from soursop leaves, the main thing I look for is the cancer preventive properties and from calamansi, all those great vitamins.  By growing this at the farm in an all organic environment, I do not have to worry about the introduction of toxins to a delicious, healthy drink.  For a low-cost, power-packed drink, this is a great option for me.  This is simple enough to make that I think it can go on everyone’s drink list.  I hope you will be inspired to try it 🙂

11 Mar 2015

The Cabbage Saga

I first wrote about planting cabbages 2 years ago and have since learnt more about it.  It still remains in my top 10 favourite vegetable, not only for the taste but also for the versatility and nutrition.  I still depend on commercial cabbage seeds as I haven’t figured out how to get my own seeds but this time around I am keeping one plant and letting it grow to see what happens as an experiment.  Cabbages are notoriously slow growers especially in comparison to other leafy vegetable like the choy sum or pak choy. It takes about 4 months before they produce a good head of cabbage.

I found that space area for a growing cabbage is important in the resulting size of the cabbage.  I experimented growing the cabbages at different length of separation of the stem and also in various sizes of polybags.  I get best results when the planting space between plants is at least 2 feet or 60 cm.  If there is a lack of water, you can see the leaves wilting but if you water it as soon as possible, you can see them perk up after about 1 hour.  So, this is a good gauge for me to see that the plants have enough water.  As with many other plants, it doesn’t like soggy soil so I make sure that the soil mix I use has good drainage but yet remain moist and I achieve it by using sufficient organicc matter in the soil mix.

By going organic and not using any growth hormones, my cabbages are not big but its leaves are tightly packed and the cabbage head weighs anywhere from 400-600 gm each.  I fertilise it with organic fertilisers (Vermicompost)  and also use an EM spray (home-made).  As the cabbage grows, I will periodically remove the old leaves at the bottom and top up the soil with some organic matter mixed with vermicompost.  I know it is time to top up with some soil when I see fine white roots at the soil surface.

I find that the biggest pest to the cabbage is the ulat bulu and the caterpillars.  They can really much their way through the leaves.  I have yet to find a fool-proof organic pesticide or pest-deterrent so I check the plants often and pick off those crawlers.  However, handle them carefully and I find that touching them bare hands causes an allergic reaction to me –  the skin gets irritated and itchy.  I find that spraying them at least once a week with the beneficial bacteria mixed with serai wangi also helps control the leaf-eating pests.  Remaining organic is important for me as I love eat these vegetable raw and since the leaves are what is consumed, using any chemical pesticide will remain on the leaves, even if it is minute amounts.

The cabbage can be harvested when the lower leaves have turned into a dark green colour whilst the cabbage head remains a lighter green.  You can also notice leaves starting to sprout from the stem below the main cabbage growth.  The baby cabbage leaves are also edible so don’t throw them away.

Once the cabbage head is harvested, the stem with the roots can be replanted and you will get baby cabbages growing off the side.  Whilst you may not get a cabbage head again, these baby cabbage leaves can be harvested and turned into a vegetable dish.

There are so many ways to eat cabbages: raw cabbages can be made into sales, coleslaw and as ulam; cooked cabbages as a vegetable dish, stir-fried, in a soup or sayer lemak, to name a few.

There are purported to be many health benefits to eating cabbages:

  • It is high in vitamin K and anthocyanins that help with mental function and concentration by preventing nerve damage and improving your brain’s defines against Alzheimer’s disease and dementia.
  • Low in fat and high in fibre which will help in your digestive system.
  • The high content in vitamin C and sulphur helps the body to remove toxins such as free radicals and uric acid.
  • Purported to have cancer preventive compounds which inhibits cancer timor growth.
  • Has antioxidants and anti-inflammatory properties.

Hence it is a good vegetable to add to my vegetable menu selection.
28 Sep 2014

Bananas – Pisang Tanduk

It took me quite some time to find baby plants of the pisang tanduk.  This plant is getting to be rare and the bananas are difficult to find at the markets.  It turns out that my uncle had some and he gave me 10 baby plants.  And so my study of the pisang tanduk begins.

The plant grow to about 6m tall, shorter to many of the other smaller size banana plants.  We planted it in a high organic content soil area.  The banana has a unique shape and is easily the largest banana amongst the many varieties of this plant.  The uniqueness of this banana plant is that it doesn’t have an inflorescence or jantung  like the other banana plants.  It is a big size banana and at the farm, one fruit can weigh 500gm.  It took slightly more than 1 year before we had our first harvest.

This banana has lots of vitamins and minerals so it is an added bonus to the great taste.  Naturally ripened, it has a very sweet with a touch of sourness taste hence is a favorite for banana fritters and a sweet coconut based dessert: pengat pisang amongst banana connoisseurs.  If the fruit was not left to properly mature and ripen, it will not have the sweetness but more of a sour creamy taste and you may be disappointed.

It can also be steamed and eaten with or without a sweet syrup.  However, not many people know of this banana nowadays due to its scarcity.  Mature but unripened bananas are also a favourite for making banana chips or kerepek pisang.  It can also be peeled and sliced and used in savoury dishes like curry. In short, it can be fried, grilled, steamed or boiled – so many options.

I am happy that we have this banana plant species at the farm as it is getting harder and harder to find it at the market.  So, should you ever find good quality pisang tanduk, I hope you will try it and enjoy the tasteful experience.

18 May 2014

SHL Herbs – Joys of Misai Kucing and Kemangi

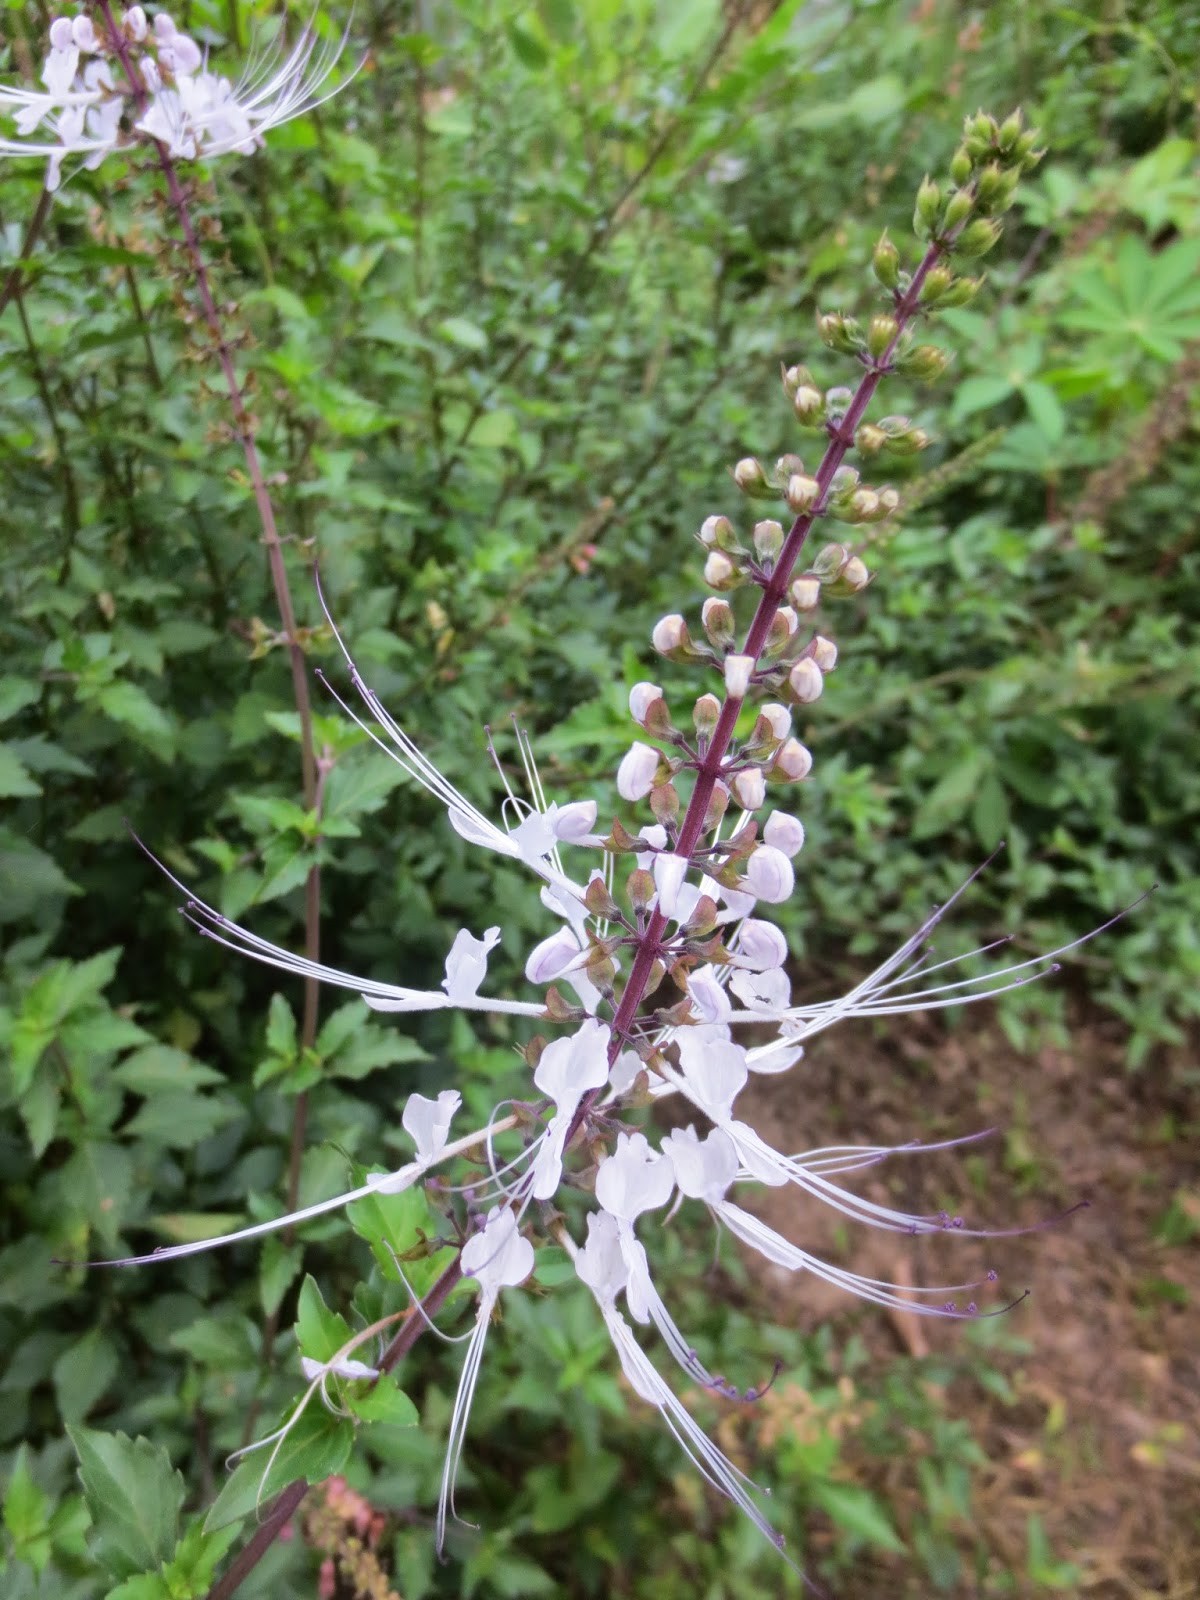
Over the last several years, I have regularly consumed teas which we produce at the farm.  Whilst I have the fresh produce readily available to make infusions, I needed a mechanism so that I can have it easily stored and readily available hence the move to produce teas.  We have several plants and herbs that traditionally have been consumed as tea.  Topping my list is the Misai Kucing tea or infusion.  In alternative therapy, this tea has been used for diabetes, high blood pressure, gout, kidney, rheumatoid athritis and blood cleansing to name a few.

I love food, and have a sweet tooth so this means that I enjoy having rich desserts, Malaysian traditional kuih, and a good steak.  As a preventive measure, I will have a mug of warm Misai Kucing tea as an after meal drink to help regulate my blood sugar and cleanse my system.  On days, when I have had a hard day working out at the farm, I will cool off with a nice, cold glass of this tea to help my body get rid of all the acids produced.  In short, I drink this tea as a normal course of my diet and not view it as a “medicine” which almost always brings a negative connotation to mind.

Being part of my normal drinks selection list, I will drink it at least 3 times a week for maintenance and have additional drinks depending on how rich my meal was.  Being fortunate to be able to produce my own tea, I only use the leaves and the flowers with its soft stalks.  All this enables me to produce a flowery tasting tea without the bitterness and I do not mix it with “fillers” but prefer to have the all-natural taste.

There are basically 2 ways to prepare the tea:

  1. Steeping 1 flat teaspoon of tea mixture in just-boiled water for about 5 minutes.  After straining the tea, more hot water can be added as long as the leaves can still produce the golden-brown tea.  
  2. After bringing the water to a boil, add the tea mixture and reduce the heat to allow a gentle simmer for about 5 minutes.  Turn off the heat and allow it to cool to chosen drinking temperature.  I use this method to prepare a concentrate by simmering 10gm of the mixture in 1 litre of water.  I will leave it to cool, strain it and store it in the refrigerator.  This way, when I would like to have some, I will pour some of the concentrate into a mug and add hot water if I want a hot tea or add cold water with or without ice if I want to have it cold.

I most often prepare a concentrate as this enables me to have it handy whenever I want some.  I normally store the concentrate for no more than 1 week.

I also bought a teapot with the strainer in it so that I can prepare the fresh, hot tea without hassle and then just keep adding hot water to it.  I will store it overnight in the fridge and add more very hot water into the teapot the next morning.  I call my Misai Kucing tea as my “Rebalancing Tea”.

I have also produce a “flavored” Misai Kucing tea by combining the Misai Kucing with Kemangi (Lemon Basil).  This produces a tea with a hint of citrus.  In traditional therapy, the Kemangi has minerals and elements that are beneficial for the heart as well as rich in nutrients so by adding this to the tea mixture, it boosts
the therapeutic value of the tea.  I also find that Kemangi helps to alleviate bloating as well as water retention.  The method I use for preparing the tea is the same as for the Misai Kucing tea.  It can also be consumed either hot or cold.  For me, this tea is my “Inner Cleansing Tea”.

We also produce pure Kemangi which is also prepare and consumed similar to the other tea mixture.  With its purported heart therapeutic value, I call this my “Heart Love Tea”.  With its anti-inflammatory properties, I drink this tea when I have over-worked my muscles and joints.  This is my alternative preventive and natural healing for my muscles and joints.

The key principle for these teas is to produce teas that can be incorporated into my daily diet and be treated as normal drinks.  My aim for my health measures is to prevent or to reduce the impact of my eating and life style on my overall health without feeling forced.  I hope others will be inspired to review their approach and will have a new normal. 🙂

15 May 2013

Put Away the Aji-No-Moto

Before Aji-No-Moto, the dishes still tasted great and a lot of it is due to the freshness of the ingredients and also the herbs and natural seasonings used.  At the farm and at home, we use the various herbs grown at the farm.  All these herbs have all kinds of well-being benefits without thinking of them as health food but as mere tasty seasonings.  Often at the market, I am asked how do you use them as seasoning so here is a summary of how I have used them:

  1. Kemangi or Lemon Basil
    With the natural lemony aroma and taste, I have used this in:
    •  the creation of salad dressings such as chopped kemangi leaves with olive oil, salt and pepper and if you want a zing to it, add some chopped chillies,
    • coconut-based gravy dishes (masak lemak) that includes seafood and/or fish – just add a few leaves
    • chopped and mixed with olive oil and added to pasta
    • seasoning for a marinate for chicken (baked or fried) and for fish and crustaceans – you can either blend it or pound it with a mortar and pestle with other ingredients
       
  2. Holy Basil or Ruku / Selasih Hitam
    It has a creamy taste with a touch of aniseed.  Some ways are:
    • chicken marinate prepared similar to kemangi leaves
    • in savoury dishes such as Asam Pedas on its own or in combination with Kemangi leaves
    • chopped and mixed with olive oil and added to pasta
  3. Lemon grass or Serai
    With its slightly spicy lemony taste, it complements many dishes and also as a refreshing drink:
    • Condiment/seasoning to many savoury dishes such as Asam Pedas, and coconut-based gravy dishes.
    • In combination with other ingredients to create a marinate for fish, seafood or chicken
    • Seasoning for steaming or boiling seafood such as cockles, clams, shrimps, crabs, etc.
       
  4. Ginger Torch Flower or Bunga Kantan
    • Definitely an important ingredient for Asam Pedas and Laksa
    • Condiment for Nasi Kerabu
    • Chopped and added to olive oil with salt and pepper for a salad dressing
  5. Selasih Putih
    With its slightly creamy taste with a twist, it has a subtle taste.  As such, I think that it can be used in many ways but I have only tried it as:
    • an ingredient as a marinate for chicken and beef
    • a seasoning in coconut-based gravy dishes
       
  6. Curry leaves or Daun Kari
    • An important ingredient in making curries to give it that extra tastiness
    • As a seasoning in creating a spicy fried chicken or ayam goreng berempah.
    • The young leaves can be chopped and added to olive oil oil for a “spicy” salad dressing
  7. Suren leaves or Daun Surian
    • As a seasoning for coconut-based gravy dishes that uses young jackfruit, bamboo shoots or young bananas
    • As a condiment to reduce the bitterness of dishes that use papaya shoots and flowers
       
  8. Tumeric or Kunyit
    • The tumeric leaves is used as a seasoning in spicy dishes of chicken and beef such as rendang
    • Chopped tumeric leaves along with the fresh pounded tumeric root as a marinate for chicken or beef
    • Fresh tumeric root pounded and used in coconut-based gravy vegetable or meat based dishes to create a masak lemak kuning.
       
  9. Ginger or Halia
    • Used as a seasoning in many coconut-based gravy dishes of seafood, chicken or beef
    • As a seasoning in soups
    • Pounded or blended with other herbs to create a marinate for chicken, beef and seafood
    • As a seasoning in rice prorridge
       
  10. Galangal or Lengkuas
    • Used as a seasoning in making rendang
    • Pounded and added to other herbs to create a marinate for chicken and beef
    • Used as a seasoning in coconut-based gravy dishes featuring chicken or beef
       
  11. Coriander or Ketumbar
    This highly fragrant leave gives the extra “oomph”
    • Chopped leaves with olive oil, lemon, salt and pepper for a light salad dressing
    • Chopped and used or its own or added to other herbs with salt to create a marinate for meats like chicken and beef which can then be fried or grilled
    • As a seasoning for rice porridge.
    • As a seasoning for soup dishes.

What I have listed are some suggestions.  You can be as creative as you like once you get to know them, the options are endless.  My adventure is just beginning and I hope to uncover others to add to my recipes list.

13 Feb 2013

Marinated Red Tilapia

Starting with a great, fresh fish, there are many ways to prepare red tilapia.  Being very fortunate to have lots of ingredients that I can use as a marinate at the farm, I decided to experiment a bit to see how the flavors will blend.  I enjoyed it so I am sharing it here.  This marinate can be applied to 1-1.5kg of fish.  Ensuring that the fish is fresh and farmed in “running water” makes a difference to the final taste of the dish.

Ingredients for marinate:

  1. 2 stalks of lemon grass (serai)
  2. 1 yellow onion
  3. Fresh tumeric (kunyit)
  4. 3 calamansi (limau kasturi)
  5. Salt to taste

I prefer using a mortar pestle (lesung batu) as opposed to a blender so I placed all the ingredients for the marinate together and pounded them until they became a paste.  I then added some salt and the juice from the calamansi – I added this after the other ingredients were pounded to prevent it from “jumping out” of the pestle.  To speed up this process, I had sliced the lemon grass, onion and tumeric.  Try to use fresh tumeric as it does make a difference to the taste as opposed to using tumeric powder – this will also add better nutrients to the dish.  There are numerous health benefits from the lemon grass, tumeric and calamansi so this is a healthy way to prepare the fish at no expense to the taste.

The marinate was then applied to the fish and left to marinate for 1 hour.  You can marinate it longer if you wish – I was just hungry hence the 1-hour marinate.
This fish can then be grilled, cooked over charcoal or fried.  For a low-calorie option, you might want to avoid deep-frying the fish.  as a note, there is no need to add any flavor enhancers as by using fresh ingredients that bursts with flavor, your palate will enjoy the experience.  In my hurry to eat the fish, I forgot to take pictures of it done 🙂

17 Jan 2013

Long green beans

Like many vegetables, the long green beans ( Malay name: kacang panjang, Botanical name: Vigna unguiculata subsp. sesquipedalis ) can be eaten raw and are deliciously crisp when fresh.  Personally, I like them when they are a darker shade of green with slight visibility of the pods for eating them raw.  They are a good source of protein, vitamin A, thiamin, riboflavin, iron, phosphorus, and potassium, and a very good source for vitamin C, folate, magnesium, and manganeseAs the fruit matures, it turns to a yellowish green to yellow to brown.

I seed them in small polybags (about 10cm diameter) using store-bought seeds. It takes approximately 3 days for the seeds to sprout and once it has sprouted, with the right soil mixture, it grows rather rapidly.  As with most of my vegetables, the soil mixture contains organic matter as well as some sand within the mixture to allow for good drainage as well as moisture control.  After about 7-10 ten days, they are ready to be transplanted.

At the farm, it is transplanted in polybags before placing them along a trellis to allow better utilization of area, effective fertilization, protection from the farm animals and ease of relocating as well as weeding.
The long beans is a climber and is easily trained.  If you plan to plant it at your house, you can plant it along the fence or by an arbor.  It takes approximately 30 days before beginning to flower which then transforms into the long beans.  During this period, the water content in the soil is very important – do not let it dry out as I find that this will reduce the quality and quantity of the beans produced thereafter.  Conversely, do not let it be in a soggy, wet soil as this will encourage rot which can kill the plant.  I let some of the beans to mature to create a new batch of planting seeds.  I fertilize them fortnightly with organic fertilizer.  The mature leaves are also removed periodically to encourage new growth and flowering as well to prevent leaves from rotting on the vine which can encourage fungus which in turn will affect the plant.

The beans are susceptible to black “aphids”, which will eat the beans and my best friend in this is the kerangga, the natural predator to these pests resulting in me not having to worry about getting rid of these pest.

The young leaf shoots can also be eaten like many other leafy vegetables – cooking it within a stir-fry dish.As with many vegetables, they are so many ways to prepare it and for me, it is a must in pecal and lontong.  Sometime, I chopped it up along with other ulam and mix it with rice for my version of nasi kerabu.  So, have fun experimenting.

17 Jan 2013

Growing Cabbage

I love cabbage – raw or cooked. I find that this vegetable is very versatile. Cabbages are rich in vitamin A and C. and Calcium. It is also a good source of Thiamin, Iron, Magnesium, Phosphorus and Potassium, and a very good source of Dietary Fiber, Vitamin K, Vitamin B6, Folate and Manganese
Thus I began to experiment planting it from store-bought seeds. I sowed the seeds into 6″ polybags in a rich, organic soil mixture. It took about 3 days for it to begin to sprout. According to the seed package label, it should be transplanted in 3 weeks. I did transplant into bigger polybags in about 3 weeks but it was based on the growth of the seedlings – I transplanted them when the width of the plant was the same as the diameter of the polybag.A moist soil is important for its growth with a regular watering, never letting the soil dry out.  I fertilized it every 10 days with organic fertilizer to ensure continuous supply of nutrients.  To keep pests away, I use organic pest deterrents such as serai wangi mix and I check the leaves often to remove any “creepy crawlies”.  I find the cabbage plant to be beautiful, like a big, green flower. 

For people with limited space, you can plant them in big planters where it can serve a dual purpose – providing a lovely plant to grace your landscape and at the same time, producing a vegetable for your consumption.  Normally, cabbages are planted in rows of soil beds but at the farm, I plant it in polybags to enable me to better care for them and also to prevent the farm animals from damaging them.  It is imperative to ensure that it receives sufficient water so I water it twice a day once it has been transplanted.

To enable a relatively constant supply of this vegetable, I have sown seeds about 1 month apart so I have plants at various stages.  After transplanting, it takes almost 3 months before they are ready for harvest.  Once the head begins to form, I stop fertilizing and just ensure that the plant receives sufficient supply of water.  I place the plants in my greenhouse to help reduce pests attacks.  The plants does well with lots of sunshine so if you are planting it on a balcony, be sure to allow it to receive around 6 hours of sunlight so a east facing balcony is best – allowing maximum sunglight with less heat.
From my experience, it takes almost 4 months for the cabbage to be ready for harvest so I have to exercise patience but I feel that it is well worth the effort.  Being pesticide-free, I enjoy eating the cabbage raw – as an ulam or salad.  You can also make coleslaw, stir-fry it as a vegetable dish, cooked as with spices and/or chili, pickle it, use it as a wrap for baked dishes, an item in sayur lontong – the options are endless.  So try growing it in a pot and enjoy the fruits of your labor :).
Notes – Lessons learnt:

  1. Soil mixture should be “light” and contain high organic content to ensure a moist growing medium and ease for root growth.
  2. Pest repellent are essential to produce beautiful cabbages.
  3. Fertilization during growth stage before formation of the cabbage head is important to ensure a good size cabbage.
  4. Lots of sunshine.
  5. Never let the soil to dry out – water is critical to good growth.  Insufficient water will result in smaller size cabbage heads.
24 Dec 2012

Kacang Bendi (Okra)

Okra which is also known as lady’s fingers or kacang bendi with its botanical name of Abelmoschus esculentus is a vegetable that can be cooked in many ways and is a popular addition in curries locally.

There are two varieties that I plant at the farm: the green okra and the red okra.  The skin of the red okra turns to light green when it is cooked so you wouldn’t know that it had red skin.  I planted this plant from seeds and it takes about 3-5 days to germinate.  From seedlings to maturity when it starts to flower takes about 60 days.

A healthy plant grows to look like a shrub with beautiful yellow flowers with a purple center.  The leaves are also a beautiful shape.  At the farm, I have planted this both in the outside ground as well as in a container.  As with many plants, it requires a soil mixture that moistens well as well as provide for good drainage.  I find that a soil mixture which also contains some sand as well as organic matter and low level of clay matter works well. 

Since it can be planted in containers, for home gardeners, you can plant this in large pots and will be a beautiful addition to your home landscape.  Do not let the soil to dry out as it does not do well when the soil is left to dry to days so check the moisture of the soil to water.  I find that it needs at least 8 hours of sun so if you plan to plant it at home, either a landed property or apartment, as long as it gets this amount of sunshine, it can do well,  It also can be planted in direct sunlight – in fact it does best in full sunshine during the day.  The plant can grow up to 2m tall but the height growth can be controlled by pinching off the tip of the plant to encourage it to “bush-out”.

Once the flower blooms, it takes about 2-3 days before the “fruit” begins to form.  From then, the bean matures within 3-4 days.  The bean is best eaten when the tip of the fruit is firm and easy to break off.  If the tip just bends or is difficult to break off, this means that the bean will be hard and results in a stringy bean when cooked.  That is why, often, you will see people testing the tip of the bean when they are selecting the bean for purchase.

Okra is a popular health food due to its high fiber, citamin C, and folate  content. Okra is also known for being high in antioxidants. Okra is also a good source of calcium and potassium.

In Malaysia, the beans are cooked in several ways: it can be blanched and eaten with sambal belacan, deep fried with a tempura batter, it can be sliced and cooked with either chillies or soy sauce, stuffed with fish “cake” and cooked in hot water, or in curry or dalca dishes.